Tuesday, March 28, 2023

Tuesday Morning Sketches Challenge #701


Welcome to my blog, where I have
a new card
to share with you each week for
 
Tuesday Morning Sketches

Here is the sketch for this week:

 
This sketch gave me pause.  First I tried stenciling the circles, but I didn't know where to go from there.
Next I tried die cutting the circles and gluing them on.  But then I realized I had 12 circles, not 9.
I tried cutting the correct number of circles, gluing them on, embossing the sheet, and then using another die to created the stitching around the outside.  Then I rotated the design, embellished it and stamped an anniversary sentiment, and it is ready to send off to my granddaughter at the end of the month.
 
 
Here are my first two attempts:


I can't wait to visit your blogs and see what you do with this sketch!
 
The Design Team would love it if you'd visit our blogs.

      You can be sure that one of us will be visiting you.


Tuesday, March 21, 2023

Tuesday Morning Sketches Challenge #700


Welcome to my blog, where I have
a new card
to share with you each week for
 
Tuesday Morning Sketches 
Here is a new sketch for you to try:

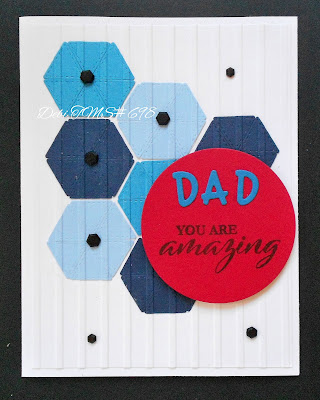
I'm just about finished making Mother's Day cards.  So I started making Father's Day cards.  
 

I thought this was an easy design and great for using scraps.


The Design Team would love it if you'd visit our blogs.

      You can be sure that one of us will be visiting you.

Tuesday, March 14, 2023

Tuesday Morning Sketch Challengs #699


Welcome to my blog, where I have
a new card
to share with you each week for
 
Tuesday Morning Sketches

Here's the sketch for this week:
 
and my card:
 

I used a From the Heart Pigwit digi stamp and sentiment. 


The Design Team would love it if you'd visit our blogs.

      You can be sure that one of us will be visiting you.

Tuesday, March 7, 2023

Tuesday Morning Sketch Challenge #698


Welcome to my blog, where I have
a new card
to share with you each week for
 
Tuesday Morning Sketches 

This week we have a brand new sketch for you to try.
I really had to put on my thinking cap for this one!  My hexagon dies are in Pennsylvania.  I'm in Florida.  Hmmm!
Since sketches are meant to be a jumping off point, I thought I'd try using triangles instead.   But there was something about that card front I didn't like.  Then I discovered I could make hexagons with 6 little triangles.   How'd I do?


I'm getting an early start on Father's Day cards for SAS4Kids, 
although this would make a fine birthday card, too.
 
The Design Team would love it if you'd visit our blogs.

      You can be sure that one of us will be visiting you.

Saturday, March 4, 2023

Send a Smile 4 Kids March Challenge #235


 Welcome to 2023 at SAS4K!

The theme for the March Challenge at

Follow SAS4Kids on Facebook!
is 
Cards 4 Boys.
 
Anything Goes for kids is always acceptable, too.
We just want to see your wonderful creations
and hope you enjoy making and sharing them! 
 
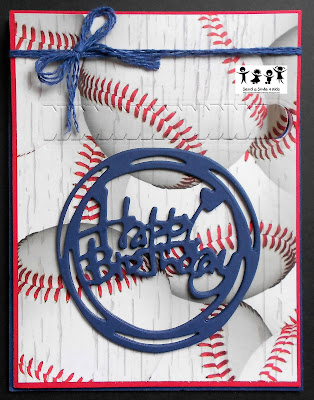
Today I'd like to share the card I made for my grandson's 18th birthday.  He loves baseball.  From the time he was small, he was always the happiest when he was outside and had a ball in his hand.  Turning 18 is such a momentous age.  He will graduate High School in a few months and in a few more he will enter Messiah University where he has already committed to playing baseball with their team.   We are so very proud of him!
 
I like to make special cards for the grandkids.   This card has a zip strip across the front.  It hides the gift underneath.
 

In case you'd like to try a card like this, here are some directions.  I hope they are not too confusing:  Cut a piece of white card stock 4" x 5 1/4".  Using a die, I cut the zip strip 2" down from the top of the card and then removed the strip.  Next I glued the baseball paper onto a piece of red cs the same size as the white piece and cut a zip strip in the same location as the white piece.  Do not remove this zip strip. The white piece was carefully glued onto the front of an A2 navy card, only applying adhesive to the very edge of the paper.  That allows you to slip a gift card, cash, or even a note into that opening between the two layers.  Just make sure the top of the gift card shows in the slot and can easily be removed.  Then you can glue the card front onto the white piece, lining up the 2 slots.
I carefully folded the zip strip back about 3/8" and wrote PULL on the tab. 
 
  
It would be great if you joined the fun at the
March Challenge.
(Cards only, please. And they need not be donated.)
 
Please take some time and visit the fabulous blogs of my teammates.  They work so hard and are very creative! 


Thanks for stopping by my blog.