Showing posts with label Gift Card Holder. Show all posts

Thursday, June 8, 2023

Graduation Card for Nick

 Last evening my grandson Nick graduated from High School.  There were over 600 kids receiving diplomas.

I followed a great tutorial for a slimline card/gift card holder I found on  Pinterest.  You can read more about the card at Frenchie Stamps where you will also find a link to the tutorial.

Here's my version:


 And, of course I used my favorite graduation stamp.

Nick will be headed to Messiah University in the fall and will be playing on their baseball team.  I was lucky to have baseball brads in my stash in just the perfect colors to use on top of the cap. 


Thanks for visiting.

Saturday, March 4, 2023

Send a Smile 4 Kids March Challenge #235


 Welcome to 2023 at SAS4K!

The theme for the March Challenge at

Follow SAS4Kids on Facebook!
is 
Cards 4 Boys.
 
Anything Goes for kids is always acceptable, too.
We just want to see your wonderful creations
and hope you enjoy making and sharing them! 
 
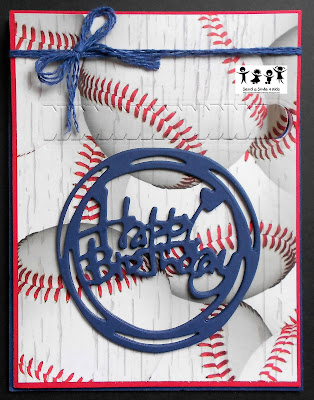
Today I'd like to share the card I made for my grandson's 18th birthday.  He loves baseball.  From the time he was small, he was always the happiest when he was outside and had a ball in his hand.  Turning 18 is such a momentous age.  He will graduate High School in a few months and in a few more he will enter Messiah University where he has already committed to playing baseball with their team.   We are so very proud of him!
 
I like to make special cards for the grandkids.   This card has a zip strip across the front.  It hides the gift underneath.
 

In case you'd like to try a card like this, here are some directions.  I hope they are not too confusing:  Cut a piece of white card stock 4" x 5 1/4".  Using a die, I cut the zip strip 2" down from the top of the card and then removed the strip.  Next I glued the baseball paper onto a piece of red cs the same size as the white piece and cut a zip strip in the same location as the white piece.  Do not remove this zip strip. The white piece was carefully glued onto the front of an A2 navy card, only applying adhesive to the very edge of the paper.  That allows you to slip a gift card, cash, or even a note into that opening between the two layers.  Just make sure the top of the gift card shows in the slot and can easily be removed.  Then you can glue the card front onto the white piece, lining up the 2 slots.
I carefully folded the zip strip back about 3/8" and wrote PULL on the tab. 
 
  
It would be great if you joined the fun at the
March Challenge.
(Cards only, please. And they need not be donated.)
 
Please take some time and visit the fabulous blogs of my teammates.  They work so hard and are very creative! 


Thanks for stopping by my blog.

Tuesday, May 10, 2022

Tuesday Morning Sketches Challenge # 656


Welcome to my blog, where I have
a new card
to share with you each week for
Tuesday Morning Sketches


 Here is this week's sketch: 
 
 
I had a real problem choosing which card, of the 3 I made, would be my front and center pick to show you today. This gift card holder is the one I like the most.
This is a mini slimline gift card holder.

 When you pull up the card, the gift card portion is exposed.

I suppose it is only fair to show you the other 2 cards.  
Maybe you would have chosen a different one to spotlight.
 
I used a book cover design on this card.
The inside of the card.

The back of the card.

And this gift card holder is card # 3. 


I hope you'll have time to play along at
this week. 
The other members of the TMS Design Team would love it if you'd visit their blogs, too.

You can be sure that one of us will be visiting you!
 

Sunday, January 10, 2021

Wonkey Donkey Card # 2

Yesterday I posted the first of two male birthday cards I made using my new set of Whimsy Stamps called Wonkey Donkeys and another new stamp set from Stamplorations called A Snarky BirthdayHere is the second card, as promised:


Gate fold card front

Once again I fussy cut the donkeys.  I colored them with pencils.  The plaid paper is from CTMH and I added a few matching accent lines of orange and blue with markers.  I forgot the lines on the inside, although I'm sure my son won't notice.  But doesn't it make a difference?

Gate fold card inside with pocket for $$$$

The Happy Birthday die is from Shady Lane Impressions.


Challenges: 

Simon Says Stamp Monday Challenge - Use a new, unused product (balloon stamp); ; Shopping Our Stash Challenge #436 - Use something new (balloon stamps); The Male Room Challenge # 146 - Animals;


Simon Says Stamp Wednesday Challenge - Something New (balloon stamps); Moving Along With The Times Challenge #126 - Something New (balloon stamps); Krafty Chicks Challenge #541 - Stamp Act; C.R.A.F.T. Challenge #582 - AG; Crazy 4 Challenges C4C346 - Something New (balloon stamps); Craft Rocket Challenge #77 - For the men/boys


Tuesday, December 22, 2020

Tuesday Morning Sketches #586


Welcome to my blog, where I have
a new card
to share with you each week for
Tuesday Morning Sketches
It's hard to believe that it is Christmas week!

There is no sketch for this week.
Instead, it is an Anything Goes challenge.

If you've purchased gift cards, you might be interested in making this gift card holder, made with 1/2 sheet of double sided patterned paper.  I followed a tutorial on You tube.  It's called a Pop Up Pocket Card and is very simple to make.


I hope you'll have time to play along at
this week. 
The Design Team would love it if you'd visit our blogs.
 Patti
You can be sure that one of us will be visiting yours!
Have a great and crafty day!
And enjoy this wonderful season!
 
ChallengesCrafty Hazelnut's Christmas Challenge #521-Anything Christmas Goes w/ option to use the word Christmas; Creatalicious Challenge #201 - Anything Goes w/option Christmas;Crafty Hazelnut's December Patterned Paper Challenge - AG; The Crafter's Cafe Challenge #257 - Holidays;
 

Thursday, December 17, 2020

Christmas Thanks

 Although all my Christmas cards are finished, 

a few gift card holders are still on my 'To Make' list.

Following the sketch at My Favorite Things,


I've made this gift card holder for our mailman.


I cut the ornaments on the cricut using the CTMH Artiste cartridge.  The Thanks stamp is also by CTMH.  For the foil die cut Christmas, I used a Sizzix die.  Inside is a Stampers Anonymous Tim Holtz sentiment stamp next to a CTMH ornament stamp.


Challenges:

My Favorite Things Sketch Challenge #520 - see sketch above 

Double Trouble Challenge #73 - Favorite Cutting Tool (I used the Cricut ),  Patterned Paper and/or Ribbon, string, etc, Enter the partnered challenge at Bitten By the Bug

Bitten By the Bug Challenge - AG using a Cricut or Die Cut (this challenge only)

Fezziwigs Festive Frolics - Last Minute Makes 

DL.ART Thankful Thursday Challenge #273 - Any Winter Holiday


Thursday, September 10, 2020

For Dad Fishing Card

I seem to be "hooked" on making cards For Dad right now.  They are for my cousin's Dad's birthday and I like to give her a small selection.  And, I have a feeling, her brother will use one, too.

This fabulous fishing themed paper was in my stash.

I cased the design of the card from one I saw on Pinterest.  Considering I couldn't find a tutorial for measurements, I think it got pretty good.  

The tag is a die cut from Paper Sweeties.  Before distressing, I stamped around the edges with a SU fish hook stamp and added the For You, Dad from the same SU set. 


This is the second pocket I made and is just a quarter inch wider than the first one.  With that little bit of extra width and by adhering it to the shirt with 1/8" red line tape on the edges of both sides and the bottom, the pocket will hold a gift card, while the tag slips through the piece across the top.

Thanks for visiting.


Challenges:

Cardz 4 Galz Challenge #130 - Buttons/and or Bows; Crafty Creations September Challenge #413 - AG; Through the Craft Room Door Challenge for week of September 8th - AG; Crafty Hazelnut's September Patterned Paper Challenge - AG; Seize the Birthday Challenge #199 - Die Cuts (tag die is from Paper Sweeties)


Monday, August 3, 2020

Any card can be a gift card holder....

all you need to do is put a gift card inside.  But if you want to make sure it doesn't fall out when the recipient opens the card, just add a little piece of paper with a half circle removed from the top edge.


For a little pizazz, I also added a strip of patterned paper to match the front of the card.  And there's still plenty of room to add the sentiment.

Here's the front of the card.
 That's another fun Bugaboo digital stamp, colored with markers.

Challenges:
 

Friday, July 31, 2020

Where are my googly eyes?

Today I decided to make another gift card holder to use up the piece of dp from yesterday.   Actually I had enough paper pieces to make three different ones, but I only got one finished.  I've used a fun Tim Holtz stamp from Stampers Anonymous.  I almost went into panic mode because I couldn't find my larger googly eyes, and this really needed googly eyes.  Luckily I remembered that my grandson is quite fond of googly eyes.  I pulled out the kids' craft box and there they were!  Now they are back in my stash.
Here's the finished project:
Holder measures 4.25" x 4.25"

inside sentiment is a CTMH stamp  
Challenges:
Ike's World Challenge #134 - Show Us Christmas 
Cardz 4 Galz Challenge #127 - Stamp on Kraft (I stamped the reindeer on kraft and then fussy cut.) 
Jingle Belles Rock Challenge - Holiday Leftovers

It was nice of you to visit.
Come back tomorrow to see what I've made for the 
August Challenge at Send a Smile For Kids.
 

Thursday, July 30, 2020

Fancy Fold Gift Card Holder

When I saw the video on You Tube (Thanks, Vicki!) for this gift card holder, 
I had to give it a try.
I really should stay away from You Tube.
I was planning to mop the kitchen floor this morning.
Here's what I did instead...


The digi image is from Bugaboo Stamps and was colored with markers.  The scalloped square was cut on the cricut (CTMH Art Philosophy Cartridge).  The remaining die cuts are from the Geometric Winter Frame set by Sizzix.  The inside stamps are by CTMH.

If I start making and filling gift card holders now, I'll have my shopping done in time for Christmas.

Challenges:
Sweet Stampin' Christmas in July Challenge - AG (The stamping is on the inside.)
Sweet Stampers Challenge #46 - Christmas in July
Die Cut Divas Challenge - Christmas in July 
Tuesday Throwdown Challenge #462 - Favorite Embellishment (ribbon)
Crimbo Crackers Challenge #212- AG Christmas or Festive related 

Thanks for visiting!
I suppose I still have time to do the floor!  Yippee! 
  

Monday, July 20, 2020

Catch the Bug Christmas in July Day 3

ABC - Anything But a Card
That's the challenge for Day 3 of this fun event.

There was a time that I started my Christmas shopping in the summer and was finished by Thanksgiving.  
Now I start making gift card holders in the summer instead.
I used a Bugaboo image of Frosty, Santa, and Rudolph 
for this gift card holder.  This trio is so fun and easy to color.

Papers and inside sentiment are from CTMH.
Here are the challenges I am entering:
Always Fun Challenge #172 - Anything But a Card 


If you read yesterday's blog post, I was on the way to watch our grandson play in a baseball  tournament.  It was a very, very hot day.  We were lucky to find a parking spot on the hill above the ballfield and could watch the games (3 altogether, 1:00, 3:15, and 6:15) from the car with the AC on.  Our boys finished 2nd in the tournament and this proud nana did not melt.  (I was really glad I wasn't taking one of those sweaty 15 year olds home with me.)

Saturday, November 9, 2019

Joyful Stars Close to My Heart November Blog Hop

Welcome to the November


Close to My Heart Joyful Stars Blog Hop.
Have some fun hopping between the blogs of this group of talented Close to My Heart consultants, and me, where we share creative projects using CTMH products.

Have you ever made a twist card?
Today I'd like to share a few twist gift card holders using several of the new CTMH papers.  These are just like a normal twist card, only the dimensions are smaller.


Here are the dimensions I used to make these three cards:


Now, since this is a blog hop,
you might have arrived here from  Marie Flayer's blog.
Your next stop is Stephanie Huber's FB page.


The hop is circular.
If you are just starting here,
simply continue hopping until you find your way back,